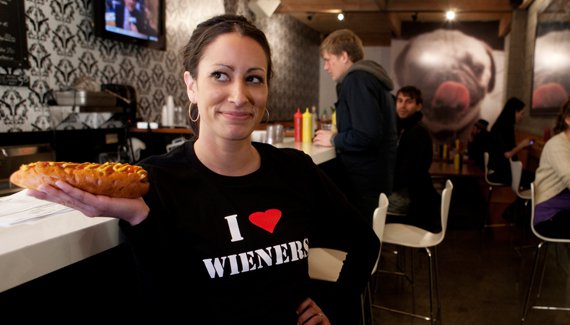
12 Days of Cookies: Day 5, Festive Gingerbread People

Gingerbread Recipe

Did you know gingerbread people have a noble history? The story goes that Queen Elizabeth I had her chef make gingerbread people in each guest’s likeness for a royal dinner party.

Half the fun of gingerbread people is decorating them, isn’t it? We always start out with simple icing outlines and dots for facial features, but after a few have been finished, we start drawing on sassy shirts and flowing skirts or groovy surfer shorts and sunglasses. Invite your friends over – kids and grownups alike – and jump-start the season with a cookie decorating party of your own!

Festive Gingerbread People
Click here to print this recipe!

Ingredients

3 1/3 cups unbleached all-purpose flour
2 teaspoons baking soda
2 teaspoons cinnamon
2 teaspoons ground allspice
1/4 teaspoon cayenne pepper
1 3/4 cups light brown sugar
3/4 cup solid vegetable shortening, room temperature
2 eggs
1/4 cup honey
1/3 cup molasses
2 tablespoons peeled and grated ginger

Click here for our Quick & Easy Cookie Icing recipe and decorating tips!

1. Sift the flour, baking soda, cinnamon, allspice and cayenne into a medium bowl. Mix with a spoon until the ingredients are evenly distributed.

2. Place the sugar and shortening in the bowl of your stand mixer. Using a paddle attachment, mix on low for about 30 seconds to start bringing the ingredients together. Increase the speed to medium and continue mixing for 5 to 8 minutes, or until the mixture is smooth and pale in color. Add the eggs one at a time, making sure each egg is fully incorporated before adding another. Add the honey, molasses and ginger and mix on medium for about 30 seconds. Scrape down the sides of the bowl with a rubber spatula and mix for another 30 seconds to make sure the ingredients are evenly distributed. Remove the bowl from the mixer and scrape down the sides one more time.

3. Fold half of the dry ingredients into the batter with a rubber spatula. After the first batch is incorporated, fold in the rest of the dry ingredients and continue folding just until all of the flour has been absorbed.

4. Using a rubber spatula, scrape the dough from the bowl onto a large piece of plastic wrap. Dust your hands with a little flour and pat the dough into a block, then wrap it tightly in the plastic wrap and chill in the refrigerator for 1 to 2 hours.

5. Preheat the oven to 325°F. Line 2 rimmed baking sheets with parchment paper.

6. Place the chilled dough on a floured work surface and roll it out 1/2-inch thick. Using a 6-inch cookie cutter, make as many gingerbread people as you can and place them on the prepared baking sheets. These cookies will spread out a little bit during baking, so leave a 2-inch space between each cookie. Roll the scraps of dough into a ball and roll it out again. You should be able to cut a few more cookies from the dough.

7. Bake the cookies, 1 sheet at a time, on the center rack of the oven for 20 to 25 minutes. To help the cookies bake evenly, rotate the baking sheet every 5 minutes or so. Let them cool completely before decorating. These cookies can be made 2 or 3 days before a decorating party and stored in an airtight container.

12 Days of Cookies: Day 4, Sour Cherry Shortbread Cookie Mix

Sour Cherry Shortbread Cookie Mix

Shortbread is a classic Scottish dessert that makes a delectable cookie. It’s a popular choice for holidays, because it’s so adaptable and can be cut into festive shapes. For years we’ve put Leslie’s famous Sour Cherry Shortbread Cookies into our Holiday Cookie Box, but this year we’re offering an extra way to enjoy these cookies.

We’re excited to announce that you can now baked up our Sour Cherry Shortbread Cookies at home using our brand new cookie mix! Just add chilled butter and a sugar garnish; we’ll take care of the rest. Before you preheat the oven though, take a look at our best baking tips and then follow along as Leslie prepares them in this video.

The recipe for this cookie comes from Leslie’s family, making it an extra special treat. If you’re searching for a great gift or stocking stuffer for your foodie friends and family members, look no further. Pick up a jar at any of our cafés!

12 Days of Cookies: Day 3, Mexican Wedding Balls

Snowball Cookies

Mexican Wedding Balls, Snowball Cookies, Russian Tea Cakes… Whatever the name, one thing is certain: These cookies will make spirits bright! The snow-white, powdery appearance makes it a favorite for cookie swaps and festive desserts. The cookies were dubbed Mexican Wedding Balls because of their common use as cheery wedding favors.

The secret to making truly scrumptious, melt-in-your-mouth Mexican Wedding Balls is using high-quality butter and pure vanilla extract. Check out our video to follow Leslie’s simple step-by-step instructions for preparing these cookies!

Mexican Wedding Balls
Click here to print this recipe!

Ingredients

1 1/2 cups whole almonds
12 ounces (3 sticks) unsalted butter, room temperature
1/3 cup granulated sugar
1 tablespoon pure vanilla extract
3 1/4 cups unbleached all-purpose flour
2 cups powdered sugar, sifted

Makes 3 dozen cookies

1. Preheat oven to 350°F.

2. Scatter almonds on a rimmed baking sheet and toast on center rack of oven for approximately 10 minutes, or until golden brown. Let cool, then finely chop and set aside.

3. Combine butter and sugar in the bowl of your stand mixer and using the paddle attachment, mix on low speed for about 30 seconds. Increase speed to medium and mix for another 5 to 7 minutes, or until the mixture is smooth and pale in color. Add vanilla extract and mix for about 30 seconds, making sure vanilla is fully incorporated. Remove the bowl from the mixer and scrape down the sides of the bowl.

4. Place almonds and flour in a medium bowl and toss together. Using a rubber spatula, fold half of the dry ingredients into the bowl of batter. After the first batch is fully incorporated, fold in the other half and continue folding until all of the dry ingredients have been absorbed, 1 to 2 minutes. Cover bowl with plastic wrap and chill in the refrigerator for 1 hour.

5. Preheat oven to 325°F. Line 2 rimmed baking sheets with parchment paper.

6. Scoop small amounts of dough out of the bowl (I like to use a small ice cream scoop), and roll the dough into 1 1/2-inch balls. Place the balls on the prepared baking sheets, about 1 inch apart, pressing them down lightly to create a flat bottom on each cookie. Chill in refrigerator for about 2 hours.

7. Back on center rack of oven, 1 sheet at a time, for 15 to 20 minutes, or until the cookies just start to color. To help the cookies bake evenly, rotate the baking sheet every 4 minutes or so. Let the cookies cool slightly on the baking sheet, then toss them in powdered sugar. Lay the sugar-coated cookies on a clean baking sheet to finish cooling. Finally, after the cookies are fully cooled, toss them in powdered sugar once again. They can be stored in an airtight container for up to 1 month at room temperature.

12 Days of Cookies: Day 2, Quick & Easy Cookie Icing

Royal Icing

Decorating sugar cookies can be a fun way to wile away a chilly afternoon with friends. Don’t despair if your little cookie canvasses aren’t perfect works of art. With a little practice, you’ll be icing cookies like our pastry chefs. In the meantime, rest assured that these cookies taste delicious no matter what – especially if you followed our tips for baking the perfect batch!

Quick & Easy Cookie Icing
Click here to print this recipe!

Ingredients

1 cup powdered sugar
1 tablespoon filtered water
Food coloring

Makes enough icing to decorated 6 to 8 six-inch cookies

1. Place powdered sugar in a medium bowl and add water. *Stir to combine until the mixture is smooth and all the sugar is dissolved. Add just a couple of drops of food coloring and mix well. You can always add more food coloring until the desired color is reached. Cover the bowl with plastic wrap and store at room temperature for up to 1 day.

2. Repeat the steps above to create more colors.

3. Fit your pastry bags with the desired piping tips. A fine tip is perfect for drawing detailed decorations and making outlines. A wider tip can be used to fill in spaces. Using a rubber spatula, fill each bag with a different frosting color. Gather the frosting near the tip so no air will escape the tip as you are decorating. When icing the cookies, make sure the piping tip is not touching the cookie, but rather hovering over the cookie. One way to cover the whole cookie with a glaze of icing is by putting on a latex glove, dipping your finger into the icing and painting the cookie with your finger.

4. While the icing is wet, add embellishments to the cookie by topping with colored sprinkles or crystal sugar. Once the icing has set, gently tap the cookie to get rid of extra sprinkles and sugar.

5. After all the cookies have been decorated, let them sit for 2 hours at room temperature, so the frosting can set.

*If your icing is too thick, stir in more water, 1/2 teaspoon at a time, until the desired consistency is reached; if too thin, continue stirring, or mix in more powdered sugar, 1 teaspoon at a time, until the desired consistency is reached.

12 Days of Cookies: Day 1, Our Best Baking Tips

Baking cookies is usually our first foray into cooking, and it remains one of the most pleasurable cooking experiences throughout our lives. The simple act of combining a few ingredients to make a big batch of sweets is a great way to spread some holiday cheer. To make sure your cookies are baked to perfection, we rounded up a few simple guidelines.

Creaming Butter

Cream the butter. If a cookie recipe calls for butter and sugar, it’s important to mix, or cream, the two together. Use a stand mixer to cream the ingredients with the paddle attachment for about five minutes. Start out on low speed for the first minute or so, and then increase the speed to medium. This process aerates the butter, creating a light color and creamy texture, and ultimately gives the cookies more height.

Eggs

Pay attention to the eggs. As with all perishable ingredients, always use the freshest, highest quality eggs you can find. Add eggs to the cookie dough one at a time, making sure each egg is completely incorporated into the batter before adding another. We recommend scraping the sides and bottom of the mixing bowl frequently with a rubber spatula to make sure every bit of the egg is mixed into the dough.

Cookie Ingredients

Fold in the dry ingredients. Rather than separately adding dry ingredients such as flour, baking soda, and salt to cookie dough, combine them in one bowl and mix well with a whisk, so that they will be evenly distributed throughout the cookies. Then, when the instructions call for it, fold the dry ingredients into the wet ingredients with a rubber spatula. Add small amounts at a time, folding in each batch until all of the flour has been absorbed into the dough. Folding the dough helps avoid over-mixing, which could result in tough cookies.

Cookie Ingredients

Chill the dough. It’s tempting to form and bake your cookies as soon as you make the dough – waiting can be agony when there are hungry people around – but chilling the finished dough for one hour in the refrigerator will ensure thicker, chewier cookies. If the butter inside the dough is not chilled before baking, it will melt quickly when placed in the oven, resulting in flat cookies that burn around the edges but stay raw in the middle. It’s worth waiting an hour to make the best cookie possible.

There really is nothing better than warm, freshly baked cookies. We hope your holiday season is filled with lots of delicious treats now that you’re armed with our best baking tips!

Find more baking tips like these as well as wonderful cookie recipes in our latest cookbook, More from Macrina.

The Great Figgy Pudding Caroling Competition

Figgy Pudding

We are spreading holiday cheer in more ways than one this year! The 28th Annual Great Figgy Pudding Caroling Competition is just around the corner, and we are excited to be part of this wonderful tradition. If anyone can get you into the spirit of the season, it’s our caroling team, The Baker’s (Dirty) Dozen!

Not only is Figgy Pudding Seattle’s biggest holiday music event, the competition provides tremendous support to the Pike Market Senior Center & Food Bank. Everyone is welcome to join us on Friday, December 5, from 6 to 8:30 p.m. in Seattle’s Westlake Center as we sing our hearts out during one truly magical night. You can find our team at the corner of 6th and Pine. With your help, we will make it to the Figgy Main Stage to compete against the top caroling teams!

While The Baker’s (Dirty) Dozen warms up their vocal chords, practices scales and rehearses Christmas carols, cue up our Wintery Mix playlist below and take a moment to donate to the Pike Market Senior Center & Food Bank.

Holidays 101: Superb Side Dishes

Turkey gets all the glory on Thanksgiving Day, but no plate is complete without a spoonful of stuffing, tendrils of scrumptious salad, and a beautiful basket of bread. We have some savory side dishes that are so good, they might just steal the spotlight.

Holiday Porcini Stuffing

Holiday Side Dishes

Our Holiday Porcini Stuffing Mix starts with handmade bread that’s dried in-house, then combined with cranberries, savory porcini mushrooms, and a blend of sautéed veggies. With enough stuffing to fill a 14-pound bird, you’re sure to satisfy the entire group – and hopefully have a little leftover for turkey sandwiches. Pick up a package, complete with recipe, at any of our cafés.

Sweet Potato & Delicata Squash Gratin

Holiday Side Dishes

This rich and creamy side dish is a must-have at your holiday table. The combination of sweet potatoes, delicata squash, roasted mushrooms and chopped walnuts will have you rethinking standard mashed potatoes. Click here to print the recipe.

Sweet & Spicy Nuts

Holiday Side Dishes

Sure, our Sweet & Spicy Nuts are irresistible right out of the bag, but they are even better chopped and added to a salad of fresh greens and dried cranberries, a roasted mix of winter root vegetables, or as a topping for sweet potato soufflé. Find our signature blend in our cafés.

Dinner Rolls

Holiday Side DishesWhile we have plenty of loaves to choose from, our pillowy soft, full-flavored dinner rolls are an easy way to wow your guests. Choose from Porcini Harvest, Buttermilk, Rustic Potato, Olivetta or Whole Wheat Cider Rolls or mix and match a couple of trays to suit your guests’ tastes. Leftover rolls will come in handy for making those day-after-Thanksgiving turkey sliders. Find our dinner roll trays in our cafés.

Holidays 101: Just Desserts

Thanksgiving Desserts

What better way to indulge with abandon than with a table filled with holiday desserts? Using a colorful tablecloth, a few cake stands, and our delicious assortment of pies, tarts and cakes, we can help you end Thanksgiving dinner on a very sweet note!

Maple Apple Pie

Thanksgiving Desserts

This show-stopping double-crusted pie is hands-down, everyone’s favorite. Sorry, Mom. It was recently named one of the 12 Best Bakery Desserts for the Holidays by The Seattle Times.

Dessert Table Tip: Team up this nine-inch pie with our nine-inch Macrina’s Pumpkin Pie and fill in the table with miniature versions of our Brandied Orange Pecan Pie and Pear Ginger Upside Down Cake.

Pecan Streusel Pumpkin Pie

Thanksgiving Desserts

Streusel is the new bacon; everything is better with it. We’ve perfected pumpkin pie and taken our recipe up a notch (OK, several notches) with a layer of sweet and crunchy pecan streusel.

Dessert Table Tip: Round out the dessert table with a nine-inch Pumpkin Cheesecake with Cranberry Compote and tiers of Gingerbread Spice Cups.

Pumpkin Cheesecake with Cranberry Compote

Thanksgiving Desserts

This silky, lightly spiced cheesecake is a twist on traditional pumpkin pie. Resting atop a crushed ginger molasses cookie crust and topped with cranberry compote, it satisfies all of your fall dessert cravings in one delectable bite.

Dessert Table Tip: Appease every palate at the table by teaming up this cheesecake with a nine-inch Brandied Orange Pecan Pie and miniature Maple Apple Pies.

Give us a call or stop by one of our cafés to pre-order your Thanksgiving desserts through November 24!

Holidays 101: Easy Party Appetizers

Amuse-bouches, hors d’oeuvres & appetizers, oh my! You don’t need a lot of time or creative flare to pull together an elegant spread of party-worthy bites. Take a look at our favorite ways to kick off the festivities without breaking a sweat.

Grissini

Grissini Appetizer

You often find these crisp Italian breadsticks dressing up the tables in restaurants across Italy, but here Grissini gets a lot of curious looks for its long shape. Rolled with fennel, green olives and olive oil, our Grissini has wonderful flavor on its own, but we love to wrap it with thinly sliced prosciutto just like they do in Italy.

Sardinian Flatbread

Sardinian Flatbread Appetizer

The Seeded Sardinian Flatbread is the newest addition to our flatbread selection. Each piece is adorned with toasted sesame, poppy and fennel seeds, adding extra color, texture and flavor to your holiday table. Top with a savory jam and favorite cheese, serve with charcuterie or break them apart and dip in one of our housemade spreads.

Crostini

Cranberry Apricot Nut Crostini Appetizer

Like the Sardinian Flatbread, our Crostini is a delicious blank slate. We have Crostini available in different flavors, but this time of year we reach for our Cranberry Apricot Nut Crostini. Mingling the flavors of dried fruit, toasted nuts and a hint of clove, this Crostini is a nice balance of sweet and savory. Pair it with our Potted Cheese or top with creamy fromage blanc and a drizzle of honey for a perfect party appetizer.

Francese Crostini

Pane Francese Appetizer

For those who don’t mind spending a little extra time in the kitchen, you can whip up a full-flavor Francese Crostini in a snap! Simply toast a sliced loaf of Pane Francese, spread it with our Fig & Olive Tapenade and then top it all off with some toasted pine nuts for a crowd-pleasing snack everyone will think you spent hours on.

From Leslie’s Desk: Creating Olivia’s Cookie

Olivia's Chocolate Chip Cookies

One of the best things about creating a new recipe is naming it. I generally like to keep the names simple and descriptive, but sometimes you just have to have fun with it. A personal favorite of mine is Olivia’s Old-Fashioned Chocolate Chip Cookies, affectionately named after my daughter.

When my daughter was still in her stroller, we would often pass an afternoon by going on an adventure. We toured our neighborhood looking at flowers, pointing out all the different colors we saw, and observing the other children. Halfway through our strolls we would stop for a juice and a cookie. We had some pretty good cookies together, but I had trouble finding just the right one. I wanted Olivia to know the kind of cookie my mom used to make, still warm, bursting with oozing chocolate chips.

The truth was that at the time we didn’t even make a cookie like that at Macrina. We had plenty of great cookies, but not the simple classic I was craving. So, using the basic Toll House recipe as a starting point, we came up with a winner. The name selection was easy and the cookie quickly became our biggest seller. As an added bonus, I now have the pleasure of hearing customers say, “I’ll have an Olivia’s.”

You can recreate this all-star cookie at home with our new Olivia’s Chocolate Chip Cookie Mix available in our cafés. Just add butter, shortening and eggs and we’ll take care of the rest! Before you preheat the oven though, take a look at our tips for baking perfect cookies.