Flaky Pie Dough Four Ways

Our Flaky Pie Dough is the most frequently prepared recipe in our pastry department—and has been since the day we opened our doors in Belltown in 1993! The dough is perfect for so many kinds of baking, from savory quiche to double-crusted pies to classic tarts.
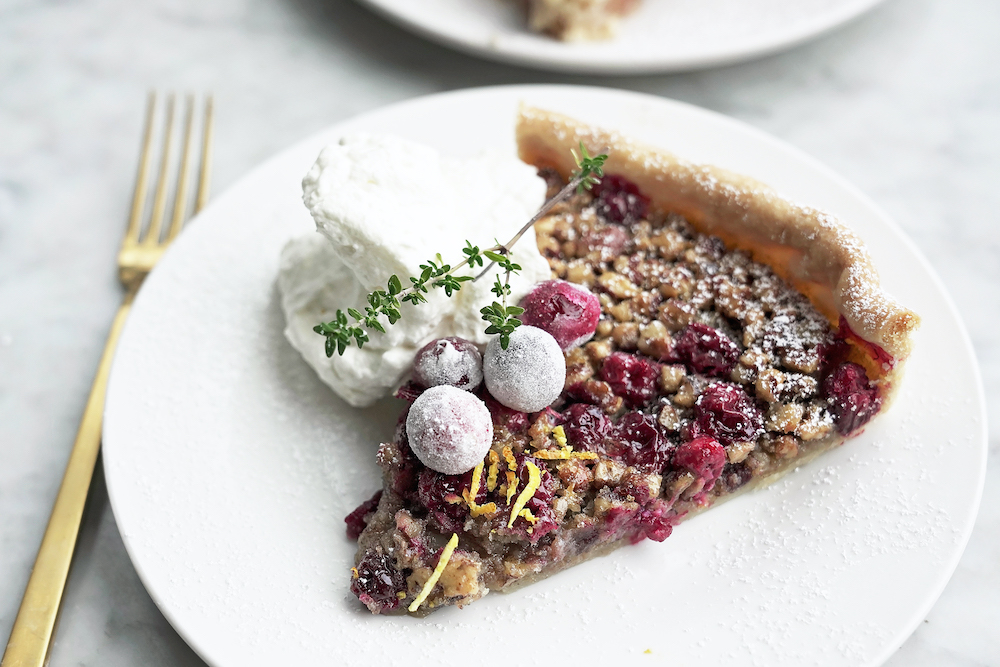
Now, for the first time, we are selling our Flaky Pie Dough in our cafés. The dough is frozen in discs and sold in a two-pack. Each 12 oz. disc rolls out to make a ten-inch tart or a nine-inch pie shell. Or you can use the two discs together to create a double-crusted pie.

Your imagination is the limit for what you can make with our Flaky Pie Dough. To get you started, we’ve included three inspiring suggestions and one of our favorite new recipes with an accompanying video of Leslie showing you how to make it.

Stop by one of our cafés and grab a few of these. When inspiration strikes, you’ll appreciate the time-saving benefits of having these at the ready.
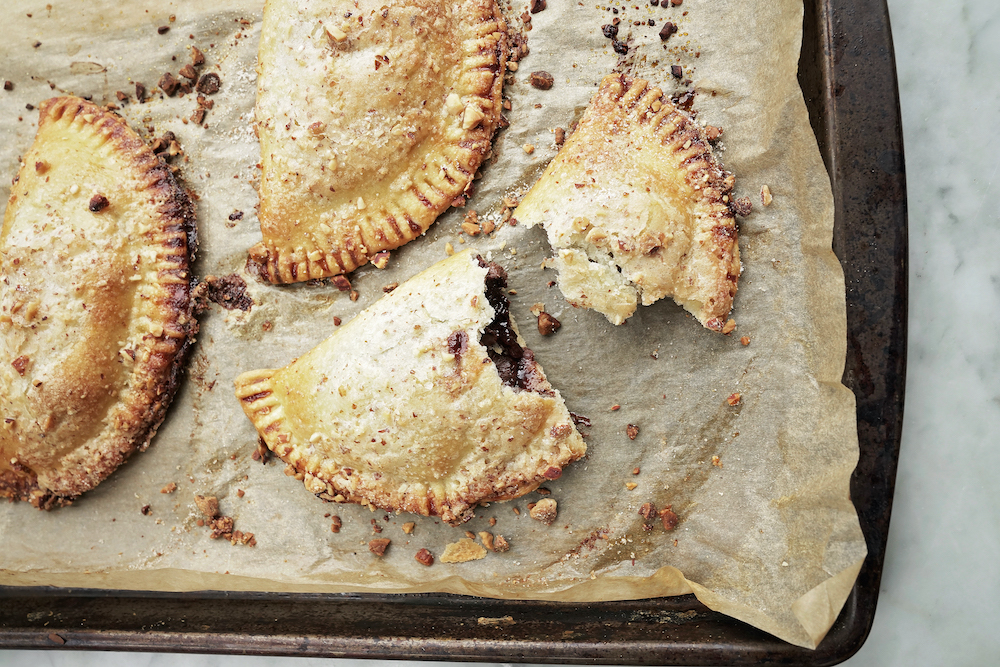
Banana Nutella Hand Pies: With our pie dough, simple hand-pies are as easy to make as the filling inside. Start with the mouthwatering combination of bananas and Nutella (what could be easier?) and work your way up through your favorite sweet and savory combinations. Simply roll the dough out and cut 5-inch circles. Add your filling, fold the dough over, and crimp the edges. Bake at 400°F for 20–25 minutes until the crust is golden brown.

Savory Galette with Butternut squash, Roasted Pear and Gorgonzola: Shortly after opening, Leslie introduced savory free-form folded tarts or galettes, and they quickly became customer favorites. This galette is a seasonal adaptation of the one on page 203 of our first cookbook. With the pie dough already made, it’s easy to turn out an elegant lunch. Or cut the galette into small slices and serve it as an appetizer.Harvest Pie: This winter pie is one Leslie serves at her home alongside pumpkin pie at Thanksgiving. It’s also one of our most requested recipes. Our Flaky Pie Crust forms the bottom crust and the top is an almond streusel. You’ll find the recipe in our first cookbook on page 249.

Macrinas Holiday Tart: With our frozen pie dough, this festive tart is a breeze to make. It’s both beautiful to look at and makes a refreshingly delicious end to a holiday meal. The tart cranberries find balance in the sweet filling and pecans add texture and flavor. Orange zest and a dash of brandy give it some zing. Find the video tutorial below!

Ingredients:
Makes one 10” tart

One 12 oz. disc of Macrina Pie Dough

1 cup chopped pecans, roasted

3 eggs

⅔ cups light brown sugar

⅔ cups corn syrup

4 Tbsp unsalted butter, melted and cooled to room temperature

2 tsp orange zest

½ tsp salt

1 Tbsp brandy

1½ cups fresh cranberries

1 Tbsp powdered sugar

Directions:

Thaw 1 disc of Macrina pie dough for 2 to 3 hours at room temperature. On a floured work surface, roll dough into a 14-inch circle that’s about an eighth-inch thick.

Fold dough in half and lift on to a 10-inch fluted tart pan. Drop dough into pan and flatten at base of pan and edges. With the remaining overhang, fold into the pan to create an edge that stands a half-inch above the top of the pan. With your hand, smooth the crust edge to a consistent thickness. Chill for 30 minutes in freezer.

Preheat oven to 375°F.

Line the tart shell with parchment paper and fill it with baking weights or beans. Bake for 25 to 30 minutes, until the edges are golden brown and the base appears dry. Remove the beans and let the shell cool.

Reduce oven temperature to 325°F.

Place the baked shell on a rimmed baking sheet. Add the pecans and cranberries to the tart shell and spread them so they’re evenly distributed.

In a medium bowl, whisk the eggs, brown sugar, corn syrup, melted butter, orange zest, salt and brandy together until well combined. Pour the mixture over the pecans and cranberries. Place the tart in the oven and bake for 35 to 40 minutes. When done, the center of the tart will be set and golden brown.

Let cool for 30 minutes. Serve with sweetened whipped cream.

Garden Pumpkin Pie Video

Last year was the first year I grew my own squash for our Thanksgiving pumpkin pie. We did a taste test between canned and fresh, and surprise, fresh squash won. My favorite pumpkin variety is the New England Pie Pumpkin. You can find the seeds in many local garden stores. It’s fun planting a garden in April, nurturing it through the summer and waiting for the squash to ripen in the fall. It’s even more fun cutting that pumpkin up and turning it into pie!

The pie crust recipe I use is Flaky Pie Dough from More From Macrina cookbook. We sell this pie as well as many other Thanksgiving treats at our cafes. Do come visit and see what we’ve got cooking. Watch the video to learn how I prepare my special pumpkin pie and follow the recipe links below.

Garden Pumpkin Pie Recipe

Flaky Pie Dough Recipe

Summer Harvest Cooking Video

The best meals always seem to be the spontaneous ones. During summer harvest season, I let the garden inspire my meals. For this lunch, I picked what was ripe, and pulled together a quick and delicious meal for my neighbors. With vegetables this fresh, they don’t need a lot of fuss so I leaned towards simple preparations that allow the natural flavors to shine.

Our meal consisted of a sugar snap pea guacamole, oven-roasted sliced beets, simple marinated grilled chicken with herbs and garlic (served with a pistol sauce that was not covered in the video, but in the recipe below), and a just-picked garden salad with a fresh raspberry vinaigrette. Enjoying the gift of a warm, sunny day we dined by the garden. I think food tastes better outside, especially while sharing stories with friends and a nice bottle of chilled rosé.

Watch the video above to learn more about how I prepared the meal.

You can find the recipes here.

Crostini with Snap Pea Guacamole

Roasted Beets

Grilled Chicken with Pistou Sauce

Garden Salad with Raspberry Vinaigrette

One-Day Artisan Loaf


You can make very flavorful artisan bread at home by using a technique that’s somewhat new in the bread-baking world: the no-knead method. I use this technique at home all the time and feel sure it will become a favorite of yours as well. The recipes I make this way don’t call for a homemade starter to build flavor. All you need is time, a heavy dutch oven, flour, yeast, olive oil, and salt.

One of the keys to baking a beautiful artisan loaf is having a humid atmosphere when the bread first hits the oven. The covered dutch oven keeps the inside air moist for the first few minutes of baking, allowing the bread’s soft outer surface to rise before it forms a hard crust. The result is a really beautiful loaf—domed, crusty, caramelized to a deep brown color, and full of complex flavors. I’ve found that baking in a cast-iron pot creates the all-time best results for home bread baking.

Click to enjoy recipes for my One-Day Artisan Loaf, One-Day Artisan Whole Grain Loaf and Pesto Ham & Cheese Sandwich.

Berry Crisp

Leslie’s go-to summer dessert is a freshly baked fruit crisp. While grilling dinner outdoors, this dish can be baking and perfuming your kitchen. Leslie’s Berry Crisp pairs sweet farmers market berries with a no-fuss topping of oats, flour, almonds, brown sugar and butter, baked until golden brown and bubbling. You can put your own twist on this recipe by using your favorite combination of berries and nuts. Served while it’s warm with a scoop homemade vanilla ice cream or a dollop of sweetened whipped cream, it’s the perfect ending to a relaxed alfresco summer dinner.

Berry Crisp
Click here to print this recipe!

Ingredients

For the topping:
1/3 cup unbleached all-purpose flour
1/4 cup thick-cut oats
1/2 cup coarsely chopped almonds (Leslie uses a combination of almonds and pine nuts in the video)
1/8 teaspoon ground cinnamon
1/3 cup packed light brown sugar
1/4 cup (1/2 stick) chilled unsalted butter, cut into 1/4-inch pieces

For the fruit:
1/2 cup sugar
2 tablespoons light brown sugar
2 tablespoons unbleached all-purpose flour
1/4 teaspoon lemon zest
7 cups of mixed berries (Leslie uses strawberries, raspberries and blueberries in video)

Makes one 9-inch baking dish

1. Position a rack in the center of the oven and preheat to 375° F. Lightly grease a 9-inch glass baking dish with canola oil.

2. To make the topping, whisk together the flour, oats, almonds, cinnamon, and brown sugar in a medium bowl. Scatter the butter pieces on top, and using a pastry cutter or two forks, cut the butter into the flour mixture until it is coarse and crumbly. Set aside.

3. To prepare the fruit, toss the sugars, flour, and lemon zest in a large bowl. Add the berries and toss well. Let sit for 10 minutes to macerate (soften and absorb the flavors).

4. Using a slotted spoon, transfer the berry mixture to the prepared baking dish. Discard the remaining juice. Dot the topping evenly over the berry mixture.

5. Bake for 45 to 60 minutes. The topping will be golden brown and the juices will be bubbling around the edges. To set the crisp, cool for 30 minutes.

Enjoy with vanilla ice cream and a dusting of powdered sugar!

Grilled Halibut on Brioche Burger Buns

Our Brioche Burger Buns are the stuff of legend, if we do say so ourselves. Not only do they fly off our shelves, lickety-split, but our wholesale partners (Hello, SkilletThe Swinery, and Re:Public!) can’t get enough of them either. Plush and buttery with just a hint of sweetness, they are profoundly delicious when toasted to a caramelized crisp. Is your mouth watering yet?

Brioche has inspired masterpieces, a knitter’s stitch, and even a font. But ours incite great works of the edible variety. We joined Leslie at her barn to see how she uses these buns to create summer sandwich perfection. With grilled halibut, spicy harissa aioli, and preserved lemons, it’s sure to be a hit at your next barbecue!

Grilled Halibut on Brioche Burger Buns
Click here to print this recipe!

Ingredients

1 pound fresh halibut
2 tablespoons coarsely chopped fresh oregano
1/2 teaspoon kosher salt
Ground black pepper to taste
1 1/4 cups pure olive oil, divided
1 1/2 cups cherry tomatoes
2 egg yolks
2 teaspoons Dijon mustard
2 tablespoons lemon juice
1 teaspoon finely chopped garlic
1 1/2 teaspoons ground harissa
*1/4 cup preserved lemons
**1 package Brioche Burger Buns

*Leslie uses the Quick Pickled Lemons recipe from Jerusalem: A Cookbook.
**Available in our cafés.

Makes 4 sandwiches

1. Preheat a grill to 500°F. Brush grill grate to remove any debris.

2. Cut halibut horizontally to create an even thickness. Sprinkle with oregano, salt and pepper, and drizzle with a little olive oil. Set aside.

3. Preheat oven to 375°F. Line a baking sheet with parchment paper, add tomatoes, and drizzle them with olive oil and season with salt. Bake for 10 to 20 minutes or until edges are golden brown. Set aside to cool.

4. In a medium bowl, add the egg yolks, Dijon, lemon juice and garlic, and whisk well to combine. While continuing to whisk, add 1 cup of olive oil in a slow, steady stream. The aioli mixture should thicken slightly but should not resemble processed mayonnaise. Stir in harissa and salt to taste.

5. Brush a little olive oil on the preheated grill grate and cook the halibut for 2 to 3 minutes on each side. While the fish is cooking, slice the buns in half and brush the cut side with remaining oil. On the coolest part of the grill, toast the buns cut side down for 1 to 2 minutes.

6. Spread 1 tablespoon of aioli on the inside of each toasted bun half. Then layer 1 tablespoon of preserved lemons on each bottom bun, followed by a piece of halibut, and a quarter of the tomatoes. Sandwich with the top buns and slice each sandwich in half for ease of eating.

Enjoy with a fresh garden salad, roasted potatoes or potato chips. Happy grilling!

Francese Crostini: Our Favorite Summer Appetizer

Since we’re all spending more time outside soaking up this gorgeous weather, we thought you would enjoy seeing what Leslie has on the grill this summer. This rustic yet elegant Francese Crostini appetizer using our Pane Francese bread toasted right on the grill and topped with fresh, local ingredients is hard to beat. You can make the Fig & Olive Tapenade at home using the recipe below, but we also sell this delicious spread in our cafés. Check out the video to learn about Leslie’s inspiration for this recipe and stop by for a freshly baked loaf of Pane Francese for your next dinner party!

Francese Crostini
Click here to print this recipe!

Ingredients

For the tapenade:
1 cup dried Black Mission figs (about 18), trimmed and quartered
1 1/2 cups water
2 tablespoons balsamic vinegar
2 cups pitted Kalamata olives, rinsed
1 tablespoon capers
1 tablespoon Dijon mustard
2 medium cloves garlic
1 1/2 teaspoons chopped fresh rosemary
1 1/2 teaspoons chopped fresh thyme
3/4 cup extravirgin olive oil, divided

For the crostini:
*1 loaf Pane Francese
2 fresh Black Mission figs, trimmed and sliced lengthwise into 12 pieces
2 tablespoons chopped Marcona almonds
1 tablespoon chopped fresh oregano
**4 ounces of Camembert, Brie or Cambozola, sliced into 12 pieces

*Available in our cafés.
** Leslie uses Dinah’s Cheese from Kurtwood Farms.

Makes 12 servings

1. In a medium saucepan over medium heat, bring the dried figs, water and balsamic vinegar to a simmer and cook until the figs are soft and the liquid has reduced to about 2 tablespoons, about 20 minutes. Cool for 10 minutes.

2. Pour the warm figs and cooking liquid into the bowl of a food processor or a blender. Pulse several times to break down the figs; scrape the bowl and purée to a smooth texture. Add the olives, capers, mustard, garlic, rosemary, thyme and 1/4 cup of olive oil. Pulse the mixture until it is spreadable and has a uniform texture. With the machine running, add another 1/4 cup olive oil in a slow stream until the mixture is smooth and easy to spread.

3. Reserve 1 cup of tapenade for the crostini. The remainder can be stored in the refrigerator for up to one week for future use.

4. Slice the bread lengthwise and brush each cut side with the remaining olive oil. Toast the bread cut side down on a grill until golden brown. Alternatively, the loaf can be toasted cut side up in the broiler until golden brown.

5. Divide the reserved tapenade in half and spread evenly on each side of the loaf. Layer each side with 6 slices of cheese and 6 slices of fig, evenly spaced. Sprinkle both sides with almonds and oregano.

6. Slice each length of bread into six pieces, making 12 pieces total. Enjoy!

Cookie Swap: A Christmas Cookie History

‘Tis the season for baking! Whether you’re hosting a Christmas party or having a quiet holiday celebration at home, chances are cookies will be part of the equation.

The tradition of baking and sharing Christmas cookies stretches back for centuries with its roots firmly planted in Europe. As people migrated to America, so did their cooking traditions. According to McCalls’ December 1994 issue, the earliest account of Christmas cookies in America came from the Dutch in the 1600s.

With an assortment of Ginger Molasses Cookies, Swedish Overnights, Mexican Wedding Balls, and Sour Cherry Brown Sugar Shortbread Cookies, our Christmas Cookie Box is a melting pot of cultural flavors. Like folklore, some of these recipes have been shared and modified so much their origins have become blurry, but we’ve tracked down some truths about each recipe.

Ginger Molasses Cookies

As Leslie says, ginger has a natural warming quality that’s perfect for this time of year. With its recipe closely mirroring that of gingerbread, conventional wisdom tells us that the Ginger Molasses cookie is a miniature version of the sweet and spicy cake.

Mexican Wedding Balls

These cookies are perhaps the most ragtag of the bunch. Also known as Russian Tea Cakes, Snowballs and Butterballs, it’s believed that this recipe came from the Moors who invaded Spain in the 8th century. Some food historians say the recipe eventually migrated to South America and Mexico with European nuns.

Swedish Overnights

No Scandinavian Christmas celebration would be complete without Swedish Overnights. Also called Swedish Heirloom Cookies, Swedish Overnights share similar ingredients to Mexican Wedding Balls. These cookies can be dusted with powered sugar, or in this case, colorful sprinkles for a festive touch.

Sour Cherry Shortbread Cookies

A classic Scottish dessert with three basic ingredients, shortbread makes a quintessential cookie. It’s a popular choice for holidays, because it’s so adaptable and can be cut into festive shapes. We’ve added coarse crystal and brown sugars, tart cherries and vanilla to our recipe for more complex flavor.

Like those before us, we hope you enjoy sharing these recipes for many years to come!

Our Favorite Apple Pie Recipe

Everyone is rolling out their favorite apple pie recipe this time of year. But, if you’ve ever tasted ours, you know it’s something special. The buttery crust holds its flakiness under miles of tart Granny Smith apples and blissfully sweet brown sugar. The combination is irresistible.

We’re sharing our apple pie recipe for those wishing to try their hand at it at home, but you can also order our apple pie in whole or mini size at any of our cafés through the holidays.

Apple Brown Sugar Pie
Click here to print this recipe!

Ingredients

8 medium Granny Smith apples (about 2 1/2 pounds), peeled, cored and sliced in to 1/2-inch wedges

1 cup plus 2 tbsp granulated sugar, divided

1/4 cup plus 1 heaping tbsp unbleached all-purpose flour, divided

1/2 cup (1 stick) unsalted butter, room temperature

1/2 cup packed light brown sugar

1 tsp ground cinnamon

1 recipe Double-Crusted Flaky Pie Dough

1 large egg, beaten with 1 tbsp water for egg wash

Lightly sweetened creme fraiche or whipped cream, for serving

Preparation
Makes one 9-inch pie

1. Position a rack in the center of the oven and preheat to 350°F. Line 2 rimmed baking sheets with parchment paper.

2. Put the apples in a large bowl. In a small bowl, mix 1 cup of granulated sugar and 1/4 cup of flour. Pour mixture over the apples and toss thoroughly – the wedges should be completely coated. Spread the apples evenly on the prepared baking sheets and bake for 15 to 20 minutes or until the apples are just tender. Halfway through baking, redistribute the apples for even baking. Cool them on the baking sheets for about 5 minutes. Carefully pour the excess juices into a bowl and reserve. Cool the apples completely at room temperature or refrigerate to speed up the process.

3. Using a fork, mash the butter, brown sugar, cinnamon, and the remaining heaping tablespoon of flour in a medium bowl until well mixed. Dot the brown sugar-butter mixture randomly onto the apples and toss thoroughly. You don’t want to have concentrations of butter – it should be dotted throughout the apples.

4. Remove the pie dough from the refrigerator and let stand at room temperature for 10 minutes to soften slightly. On a floured work surface, roll out the larger disk into a circle roughly 15 inches in diameter and 1/8-inch thick. This is your bottom crust. As you’re rolling, check frequently to make sure the dough isn’t sticking; add flour to the dough and work surface as needed. Fold the dough in half and transfer it to a 9-inch pie pan. Place the dough in half of the pan and then unfold, draping it evenly over the entire pan. This is the easiest way to move the dough without breaking it. Gently fit the dough into the pan and trim excess (clean scissors work well for this), leaving a 1-inch overhang.

5. Roll out the smaller disk into a circle roughly 10 inches in diameter and 1/8-inch thick. Invert another 9-inch pie pan on top of the dough and use a small, sharp knife to cut a circle slightly larger than the pan. This is your top crust. Cut six 2-inch slots (or any pattern you choose) in the middle to vent steam from the pie as it bakes. Using a pastry brush, paint egg wash around the outer 1/2-inch of the bottom crust.

6. Spoon the filling into the shell, lightly packing the apples and leveling the top. Invert the top crust over the filling and press down lightly on the egg-washed edge. If the dough extends farther than the pan, cut away the excess. Bulky pie edges can break during the baking process or remain under-baked when the rest of the pie is finished.

7. Brush the top crust with the egg wash. Fold the bottom crust over-hang up and over about 1/2 inch of the top crust, pressing the layers of dough together. With a fork or your fingers, crimp the edge decoratively, then brush with a little more egg wash. Sprinkle the remaining 2 tablespoons of granulated sugar evenly over the top of the pie.

8. Chill the pie in the freezer for 30 minutes. Don’t be tempted to skip this step! The freezer will firm up the pie dough, which, by this time, will have become fairly soft from handling. Re-chilling the butter will prevent the crust from shrinking, make the dough less apt to fall, and create a flakier finished product.

9. Increase oven temperature to 375°F. Place the pie on a rimmed baking sheet and bake for 30 minutes. Reduce oven temperature to 350°F and bake until the top is deep brown and the filling is bubbling, about 1 hour. Cool the pie for about 1 hour before serving to let it set up.

10. To serve, spoon some of the reserved apple juice to pool on each plate and top with a slice of pie and a dollop of lightly sweetened crème fraîche or whipped cream.