Flour 101: Artisan No-Knead Bread

Artisan No-Knead Bread

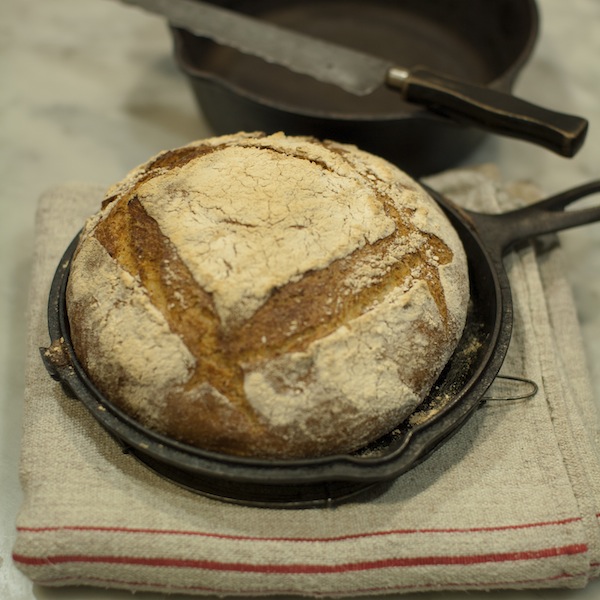
If you’re a proper breadhead, you’ve probably taken a stab at Jim Lahey’s no-knead bread by now. It seems like every baker has their own rendition of this simple recipe, but ours stands out from the crowd with its extra dimension of flavor and texture from stone-ground flour. Agave nectar lends a subtle sweetness and rich color, making this loaf a beautiful addition to any meal. The best part of all? Time does most of the work for you. Start it in the morning and you’ll be wowing your dinner guests with freshly baked bread without breaking a sweat. It’s so good it happens to be Leslie’s favorite go-to bread recipe when she doesn’t have time to swing by the bakery. Now you have to try it!

The recipe below is meant to be baked in a standard dutch oven. Pick up our cookbook, More from Macrina, for modifications using a double dutch oven.

One-Day Artisan Whole Grain Loaf
Click here to print this recipe!

Ingredients

1 3/4 cups lukewarm filtered water (about 80°F)
2 tablespoons amber agave syrup
2 teaspoons active dry yeast
1 1/4 cups (5 1/2 ounces) unbleached all-purpose flour
1 cup (4 1/2 ounces) stone-ground whole wheat flour
1/2 cup (2 ounces) stone-ground rye flour
2 teaspoons kosher salt

Preparation
Makes One 9-Inch Round Loaf

1. Line a medium bowl with a clean cotton flour sack towel and sprinkle it heavily with flour. Set aside.

2. Combine the water and agave syrup in a large bowl. Sprinkle the yeast over the surface of the liquid and whisk gently until it has dissolved. Let the mixture sit for about 3 minutes to activate the yeast.

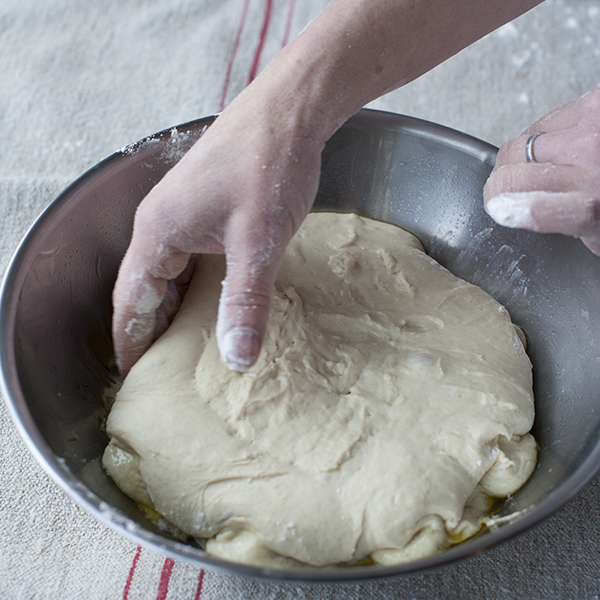
3. Add the flours and salt. Using a rubber spatula, mix the ingredients for 2 to 3 minutes by pulling the spatula through the dough and flipping it over to simulate a kneading motion. The dough will have no more flour pockets and will be quite wet. Cover the bowl with plastic wrap and let the dough rise for 2 hours at warm room temperature (75 to 80°F) or until the dough has doubled in size.

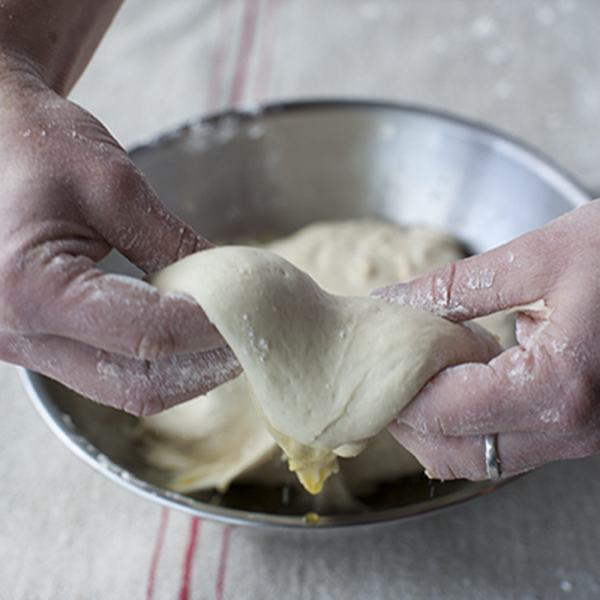
4. Lightly sprinkle the top of the dough with flour and do a baker’s turn. Cover the bowl with plastic wrap and let the dough rise again at room temperature for another 2 hours.

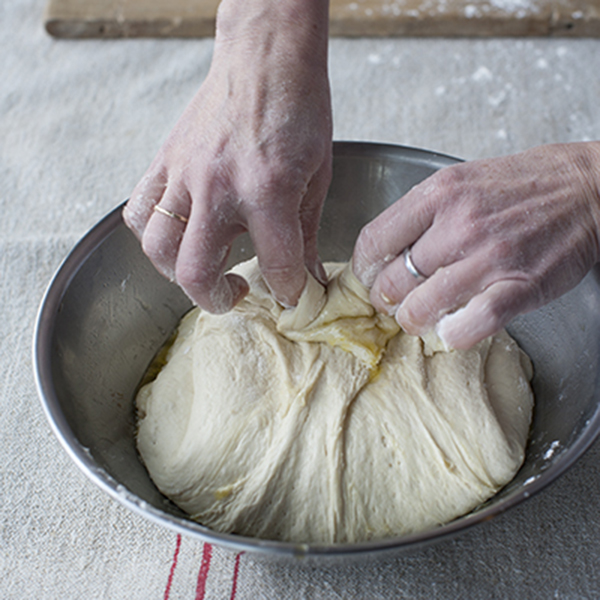
5. When the dough has risen, do a second baker’s turn. Again, cover the bowl with plastic wrap and let the dough rise at room temperature for another hour.

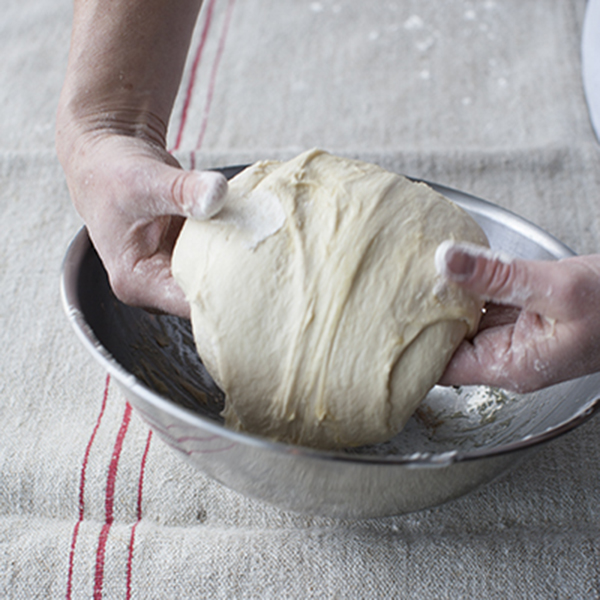
6. Transfer the dough onto a floured work surface and do a third baker’s turn – this time on your work surface rather than in the bowl. Invert the loaf so that it is seam side down, then cup your hands around the dough ball, resting the outer portion of your hands on the work surface. Move the ball in a circular motion to tighten it at the base. Invert the rounded loaf again and place it seam side up in the towel-lined bowl; lightly cover the top with the overhanging towel. Let it rise at room temperature until it is about 1 1/2 times its original size, about 1 hour. This dough should have a texture like Jell-O, slightly under-proofed. If it has risen too much at this stage, it will collapse when you place it in the dutch oven.

7. One hour before baking, preheat the oven to 450°F. Place the cast iron dutch oven and its lid inside to preheat. Flip the dough onto your floured work surface and slowly remove the cloth. With a sharp paring knife or razor blade, cut a 1/8-inch-deep, 4-inch square on the top of the dough. Using oven mitts, quickly retrieve the dutch oven and remove the lid. Gently drop the dough into the dutch oven, replace the lid and slide into the oven.

8. Bake for 30 minutes, then remove the lid. Continue baking until the loaf is deep brown and very crusty, about another 20 minutes.

9. Flip the loaf out onto a wire rack (the loaf should release easily from the pan) and let cool completely before cutting.

Flour 101: How to Work with Wet Dough

Want to make a ciabatta or baguette? You’re going to have to get your hands doughy. Working with wet dough takes practice and patience…and a little extra flour on your fingertips. This sticky stuff, if treated right, creates a golden-brown crust and cream colored crumb. But overwork it and your loaf will come out less than stellar. That’s because kneading and handling wet dough too much overdevelops the gluten (the part that gives your loaf shape and texture).

To produce the most beautiful, freshly baked loaf, knead wet dough gently in the beginning and then do what we breadheads call a “baker’s turn.”

Step 1: Flour your hands well to prevent sticking to the dough. Keeping the dough in a bowl, use your fingertips to release the edges of the dough from the bowl.

Working with Wet Dough

Step 2: Pull and stretch the right side of the dough outward, extending the dough past the rim of the bowl about six inches. Bring the stretched dough back to the center of the bowl and lay it on top of the dough ball.

Working with Wet Dough

Step 3: Repeat Step 2 with the left side as well as top and bottom portions of the dough, bringing the stretched dough back to the center each time.

Working with Wet Dough

Step 4: Flip the dough ball over, placing it seam side down in the bowl.

Working with Wet Dough

Now you’re ready to proceed according to your recipe’s instructions. Some recipes require several rounds of bakers turns after each resting period. This helps develop the gluten and give your loaf shape.

Check back next week when we’ll be making our One-Day Artisan Whole Grain Loaf using flour mentioned in our previous Flour 101 blog post and preparing our wet dough with using the baker’s turn technique.

Flour 101: A Few of Our Favorite Flours

National Flour Month

Let’s face it, without flour our bread racks would be bare, our pastry cases empty, and there would be a little less bounce in our steps. It’s a key ingredient in just about everything we make, so it’s only natural that we put a lot of consideration into the brands and types we use.

In honor of National Flour Month, we’re dipping into the fluffy world of flour with a little series taking you from grain to loaf. First up, let’s talk about our favorite flour suppliers and why Leslie selected each one.

Fairhaven Organic Flour Mill – More and more we are reaching for Fairhaven Mill’s flour for our products. The folks at Fairhaven strive to work with local farmers whenever possible, and as a result 70 percent of the grain used in their flour is grown right here in Washington. The whole-grain milled flour that we get from Fairhaven is made with grain grown on the Williams Brothers’ farm in Walla Walla. Milling the grain completely intact preserves its nutrition and natural sweetness. That exceptional flavor and texture really shines through in our Vollkorn, Pane Francese, Greek Olive and Raisin Pumpernickel to name just a few.

Cook Natural Products – Leslie chooses Cook’s identity-preserved wheat flour, because it creates a very flavorful bread. Identity-preserved grain is never mingled with other grains nor is it ever modified, so bakers know exactly what to expect with quality and flavor. This fine ingredient is one of the reasons our signature Baguette is so delicious.

Shepherd’s Grain – Shepherd’s Grain flour is a favorite staple among many local bakers. Recognizing the benefits of sustainable agriculture, this brand sources grain from family farms built with those practices in mind. Their growers use no-till and direct seed farming to conserve soil, prevent erosion and increase fertility. You’ll find Shepherd’s Grain Low-Gluten Strength Flour in our Mrs. D’s Vegan Cookie.

As simple an ingredient as flour may be, sourcing the best not only impacts the food we make, it affects our environment and farmers too. You can find more information on the flour we use as well as recipes for many of our artisan breads in our More from Macrina cookbook.

Now that we have the basics covered, check back next week when we’ll get into the nitty gritty of working with wet dough!