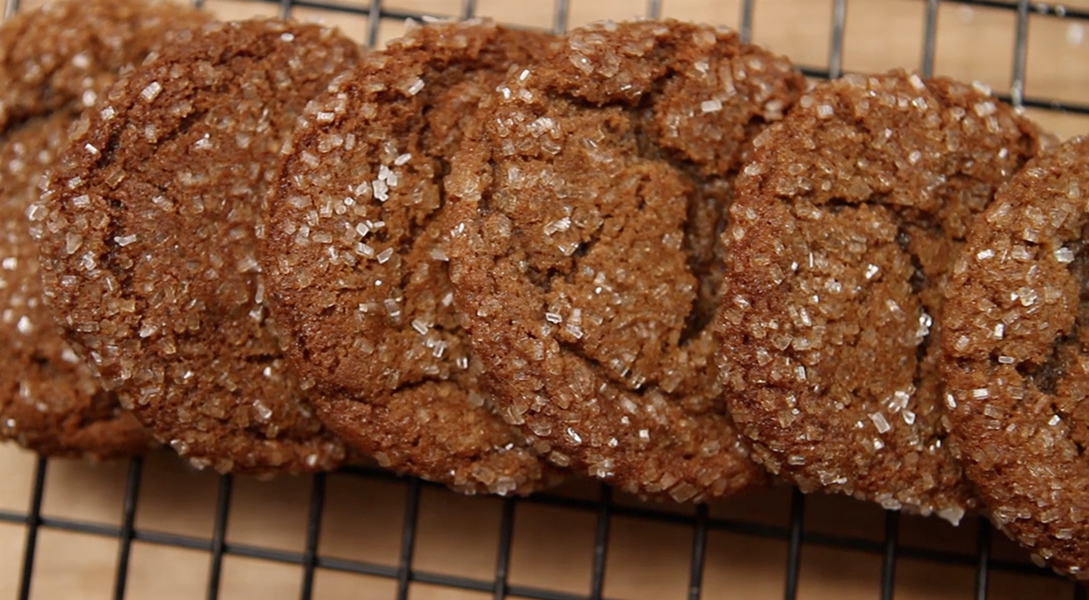
12 Days of Cookies: Day 8, Pistachio Shortbread Cookies

Shortbread Cookies

While shortbread cookies go down in history as one of the oldest treats (they date back to medieval times), the very first shortbread recipe appeared in “Mrs. McLintock’s Recipes for Cookery and Pastry-Work,” a Scottish cookbook published in 1736. The quaint recipe reads:

To Make Short Bread

Take a peck of Flour, put three lb of Butter in amoung a little water, and let it melt, pour it in amoung your Flour, put in a Mutchkin of good Barm; when it is wrought divide it in three parts, roll out your cakes longer then broad, and gather from the sides with your Finger, cut down the Middle and job it on Top, then send it to the oven.

One of the reasons we have loved shortbread for centuries is the cookie’s adaptability. Mary, Queen of Scots, adored the herbaceous notes of caraway seeds folded into the dough; Queen Victoria preferred hers with a pinch of salt; and the Girls Scouts gravitate toward shortbread with a lemony lift.

From Pine Nut Rosemary to Salted Orange, we include a handful of shortbread cookie variations in our Holiday Cookie Box. But, the Pistachio Shortbread Cookie is a classic at Macrina. The pistachio’s pale green hue naturally points to holiday celebrations and its buttery flavor highlights the cookie’s simple ingredients.

Find our Holiday Cookie Box in our cafés through the holidays, and pick up our latest cookbook, More from Macrina, to enjoy our Pistachio Shortbread Cookie recipe all year long!

12 Days of Cookies: Day 7, Bizcochos

Bizcochos

This year we changed up the assortment in our Holiday Cookie Box to reflect the tastes of our pastry team and include recipes that they grew up enjoying. The Bizcocho cookie is rooted in Spanish culture and a staple on holiday tables. It’s also popular for cookie swaps, so we thought it would be perfect to feature. You’ll know it by its dome shape and sandy color.

The idea to include Bizcochos came from Jennafer Claproth, pastry lead at our Sodo location. Jennafer’s great-great-aunt Tia Theresa was a wonderful baker who passed her recipes down to her children, who then passed them on to their cousin, Jennafer’s grandmother.

“I remember as a kid my great-cousins would come to my grandma’s house to make these cookies, plus various others, for Christmas,” says Jennafer. “Having them give us the recipe was a challenge, since my aunt never had any exact measurements and neither did my cousins.”

One day, Jennafer decided the only way to get the recipe was to make them with one of her cousins. Every pinch of spice and handful of flour that her cousin used was meticulously measured and written down until they had the precise recipe.

When we gathered together at Leslie’s home last summer to brainstorm ideas and discuss recipes for the Holiday Cookie Box, Jennafer shared her Bizcochos. It was love at first bite. The sandy texture melts into a sweet, buttered pecan flavor, making it impossible to eat just one.

“These cookies continue to be made every Christmas and we wait for them all year long,” says Jennafer.

Find Jennafer’s Bizcochos tucked into our Holiday Cookie Box, available in our cafés through the end of the year!

12 Days of Cookies: Day 6, Macaroons

Macaroon History

Macarons sure have had their time in the spotlight, haven’t they? Those precious cookies with their little domes drenched in Technicolor.

But we mustn’t forget the Macaroon. Often woefully confused for the Macaron (in name, not appearance), the Macaroon is just as deserving of star treatment. The laidback, oh-so-approachable cousin of the Macaron is made with just a few simple ingredients (sugar, vanilla, egg whites and coconut), but they sometimes get dressed up with a bit of cocoa powder or take a dip in some chocolate.

Macarons and Macaroons do have a shared history. Food historians believe they both got their start in Europe. Some say that Macarons gained fame when two Benedictine nuns, trying to climb out of hard times, began selling Macarons to pay the bills and the country fell in love. It wasn’t long before there were street vendors selling the cookies on every street corner in Paris. In 1930, Pierre Desfontaines, relative of the famous Louis Ernest Ladurée, had the bright idea to take two Macaron cookies and sandwich them with a bit of chocolate ganache, sealing the fate of the modern day Macaron and launching Ladurée’s rise to fame.

There are many stories about when coconut was folded into the mix to make the Macaroon, but most believe that European Jews adapted the Macaron recipe to make a perfect Passover treat. Flour and almond paste were omitted and sweet, shredded coconut was added. Similar recipes can also be found in Scottish, Dominican, Indian, Spanish, Turkish, and Irish cultures.

While we enjoy both cookies, the Macaroon has our heart. Crisp on the outside, chewy in the center, and delightfully sweet, Macaroons are reminiscent of the cookies our moms used to make. They are a rustic homage to childhood.

Our four-packs of Macaroons, in chocolate or vanilla, are the perfect little something to tuck into a Christmas stocking. Find them at any of our cafés!

12 Days of Cookies: Day 5, Festive Gingerbread People

Gingerbread Recipe

Did you know gingerbread people have a noble history? The story goes that Queen Elizabeth I had her chef make gingerbread people in each guest’s likeness for a royal dinner party.

Half the fun of gingerbread people is decorating them, isn’t it? We always start out with simple icing outlines and dots for facial features, but after a few have been finished, we start drawing on sassy shirts and flowing skirts or groovy surfer shorts and sunglasses. Invite your friends over – kids and grownups alike – and jump-start the season with a cookie decorating party of your own!

Festive Gingerbread People
Click here to print this recipe!

Ingredients

3 1/3 cups unbleached all-purpose flour
2 teaspoons baking soda
2 teaspoons cinnamon
2 teaspoons ground allspice
1/4 teaspoon cayenne pepper
1 3/4 cups light brown sugar
3/4 cup solid vegetable shortening, room temperature
2 eggs
1/4 cup honey
1/3 cup molasses
2 tablespoons peeled and grated ginger

Click here for our Quick & Easy Cookie Icing recipe and decorating tips!

1. Sift the flour, baking soda, cinnamon, allspice and cayenne into a medium bowl. Mix with a spoon until the ingredients are evenly distributed.

2. Place the sugar and shortening in the bowl of your stand mixer. Using a paddle attachment, mix on low for about 30 seconds to start bringing the ingredients together. Increase the speed to medium and continue mixing for 5 to 8 minutes, or until the mixture is smooth and pale in color. Add the eggs one at a time, making sure each egg is fully incorporated before adding another. Add the honey, molasses and ginger and mix on medium for about 30 seconds. Scrape down the sides of the bowl with a rubber spatula and mix for another 30 seconds to make sure the ingredients are evenly distributed. Remove the bowl from the mixer and scrape down the sides one more time.

3. Fold half of the dry ingredients into the batter with a rubber spatula. After the first batch is incorporated, fold in the rest of the dry ingredients and continue folding just until all of the flour has been absorbed.

4. Using a rubber spatula, scrape the dough from the bowl onto a large piece of plastic wrap. Dust your hands with a little flour and pat the dough into a block, then wrap it tightly in the plastic wrap and chill in the refrigerator for 1 to 2 hours.

5. Preheat the oven to 325°F. Line 2 rimmed baking sheets with parchment paper.

6. Place the chilled dough on a floured work surface and roll it out 1/2-inch thick. Using a 6-inch cookie cutter, make as many gingerbread people as you can and place them on the prepared baking sheets. These cookies will spread out a little bit during baking, so leave a 2-inch space between each cookie. Roll the scraps of dough into a ball and roll it out again. You should be able to cut a few more cookies from the dough.

7. Bake the cookies, 1 sheet at a time, on the center rack of the oven for 20 to 25 minutes. To help the cookies bake evenly, rotate the baking sheet every 5 minutes or so. Let them cool completely before decorating. These cookies can be made 2 or 3 days before a decorating party and stored in an airtight container.

12 Days of Cookies: Day 4, Sour Cherry Shortbread Cookie Mix

Sour Cherry Shortbread Cookie Mix

Shortbread is a classic Scottish dessert that makes a delectable cookie. It’s a popular choice for holidays, because it’s so adaptable and can be cut into festive shapes. For years we’ve put Leslie’s famous Sour Cherry Shortbread Cookies into our Holiday Cookie Box, but this year we’re offering an extra way to enjoy these cookies.

We’re excited to announce that you can now baked up our Sour Cherry Shortbread Cookies at home using our brand new cookie mix! Just add chilled butter and a sugar garnish; we’ll take care of the rest. Before you preheat the oven though, take a look at our best baking tips and then follow along as Leslie prepares them in this video.

The recipe for this cookie comes from Leslie’s family, making it an extra special treat. If you’re searching for a great gift or stocking stuffer for your foodie friends and family members, look no further. Pick up a jar at any of our cafés!

12 Days of Cookies: Day 3, Mexican Wedding Balls

Snowball Cookies

Mexican Wedding Balls, Snowball Cookies, Russian Tea Cakes… Whatever the name, one thing is certain: These cookies will make spirits bright! The snow-white, powdery appearance makes it a favorite for cookie swaps and festive desserts. The cookies were dubbed Mexican Wedding Balls because of their common use as cheery wedding favors.

The secret to making truly scrumptious, melt-in-your-mouth Mexican Wedding Balls is using high-quality butter and pure vanilla extract. Check out our video to follow Leslie’s simple step-by-step instructions for preparing these cookies!

Mexican Wedding Balls
Click here to print this recipe!

Ingredients

1 1/2 cups whole almonds
12 ounces (3 sticks) unsalted butter, room temperature
1/3 cup granulated sugar
1 tablespoon pure vanilla extract
3 1/4 cups unbleached all-purpose flour
2 cups powdered sugar, sifted

Makes 3 dozen cookies

1. Preheat oven to 350°F.

2. Scatter almonds on a rimmed baking sheet and toast on center rack of oven for approximately 10 minutes, or until golden brown. Let cool, then finely chop and set aside.

3. Combine butter and sugar in the bowl of your stand mixer and using the paddle attachment, mix on low speed for about 30 seconds. Increase speed to medium and mix for another 5 to 7 minutes, or until the mixture is smooth and pale in color. Add vanilla extract and mix for about 30 seconds, making sure vanilla is fully incorporated. Remove the bowl from the mixer and scrape down the sides of the bowl.

4. Place almonds and flour in a medium bowl and toss together. Using a rubber spatula, fold half of the dry ingredients into the bowl of batter. After the first batch is fully incorporated, fold in the other half and continue folding until all of the dry ingredients have been absorbed, 1 to 2 minutes. Cover bowl with plastic wrap and chill in the refrigerator for 1 hour.

5. Preheat oven to 325°F. Line 2 rimmed baking sheets with parchment paper.

6. Scoop small amounts of dough out of the bowl (I like to use a small ice cream scoop), and roll the dough into 1 1/2-inch balls. Place the balls on the prepared baking sheets, about 1 inch apart, pressing them down lightly to create a flat bottom on each cookie. Chill in refrigerator for about 2 hours.

7. Back on center rack of oven, 1 sheet at a time, for 15 to 20 minutes, or until the cookies just start to color. To help the cookies bake evenly, rotate the baking sheet every 4 minutes or so. Let the cookies cool slightly on the baking sheet, then toss them in powdered sugar. Lay the sugar-coated cookies on a clean baking sheet to finish cooling. Finally, after the cookies are fully cooled, toss them in powdered sugar once again. They can be stored in an airtight container for up to 1 month at room temperature.

12 Days of Cookies: Day 2, Quick & Easy Cookie Icing

Royal Icing

Decorating sugar cookies can be a fun way to wile away a chilly afternoon with friends. Don’t despair if your little cookie canvasses aren’t perfect works of art. With a little practice, you’ll be icing cookies like our pastry chefs. In the meantime, rest assured that these cookies taste delicious no matter what – especially if you followed our tips for baking the perfect batch!

Quick & Easy Cookie Icing
Click here to print this recipe!

Ingredients

1 cup powdered sugar
1 tablespoon filtered water
Food coloring

Makes enough icing to decorated 6 to 8 six-inch cookies

1. Place powdered sugar in a medium bowl and add water. *Stir to combine until the mixture is smooth and all the sugar is dissolved. Add just a couple of drops of food coloring and mix well. You can always add more food coloring until the desired color is reached. Cover the bowl with plastic wrap and store at room temperature for up to 1 day.

2. Repeat the steps above to create more colors.

3. Fit your pastry bags with the desired piping tips. A fine tip is perfect for drawing detailed decorations and making outlines. A wider tip can be used to fill in spaces. Using a rubber spatula, fill each bag with a different frosting color. Gather the frosting near the tip so no air will escape the tip as you are decorating. When icing the cookies, make sure the piping tip is not touching the cookie, but rather hovering over the cookie. One way to cover the whole cookie with a glaze of icing is by putting on a latex glove, dipping your finger into the icing and painting the cookie with your finger.

4. While the icing is wet, add embellishments to the cookie by topping with colored sprinkles or crystal sugar. Once the icing has set, gently tap the cookie to get rid of extra sprinkles and sugar.

5. After all the cookies have been decorated, let them sit for 2 hours at room temperature, so the frosting can set.

*If your icing is too thick, stir in more water, 1/2 teaspoon at a time, until the desired consistency is reached; if too thin, continue stirring, or mix in more powdered sugar, 1 teaspoon at a time, until the desired consistency is reached.

12 Days of Cookies: Day 1, Our Best Baking Tips

Baking cookies is usually our first foray into cooking, and it remains one of the most pleasurable cooking experiences throughout our lives. The simple act of combining a few ingredients to make a big batch of sweets is a great way to spread some holiday cheer. To make sure your cookies are baked to perfection, we rounded up a few simple guidelines.

Creaming Butter

Cream the butter. If a cookie recipe calls for butter and sugar, it’s important to mix, or cream, the two together. Use a stand mixer to cream the ingredients with the paddle attachment for about five minutes. Start out on low speed for the first minute or so, and then increase the speed to medium. This process aerates the butter, creating a light color and creamy texture, and ultimately gives the cookies more height.

Eggs

Pay attention to the eggs. As with all perishable ingredients, always use the freshest, highest quality eggs you can find. Add eggs to the cookie dough one at a time, making sure each egg is completely incorporated into the batter before adding another. We recommend scraping the sides and bottom of the mixing bowl frequently with a rubber spatula to make sure every bit of the egg is mixed into the dough.

Cookie Ingredients

Fold in the dry ingredients. Rather than separately adding dry ingredients such as flour, baking soda, and salt to cookie dough, combine them in one bowl and mix well with a whisk, so that they will be evenly distributed throughout the cookies. Then, when the instructions call for it, fold the dry ingredients into the wet ingredients with a rubber spatula. Add small amounts at a time, folding in each batch until all of the flour has been absorbed into the dough. Folding the dough helps avoid over-mixing, which could result in tough cookies.

Cookie Ingredients

Chill the dough. It’s tempting to form and bake your cookies as soon as you make the dough – waiting can be agony when there are hungry people around – but chilling the finished dough for one hour in the refrigerator will ensure thicker, chewier cookies. If the butter inside the dough is not chilled before baking, it will melt quickly when placed in the oven, resulting in flat cookies that burn around the edges but stay raw in the middle. It’s worth waiting an hour to make the best cookie possible.

There really is nothing better than warm, freshly baked cookies. We hope your holiday season is filled with lots of delicious treats now that you’re armed with our best baking tips!

Find more baking tips like these as well as wonderful cookie recipes in our latest cookbook, More from Macrina.

The Great Figgy Pudding Caroling Competition

Figgy Pudding

We are spreading holiday cheer in more ways than one this year! The 28th Annual Great Figgy Pudding Caroling Competition is just around the corner, and we are excited to be part of this wonderful tradition. If anyone can get you into the spirit of the season, it’s our caroling team, The Baker’s (Dirty) Dozen!

Not only is Figgy Pudding Seattle’s biggest holiday music event, the competition provides tremendous support to the Pike Market Senior Center & Food Bank. Everyone is welcome to join us on Friday, December 5, from 6 to 8:30 p.m. in Seattle’s Westlake Center as we sing our hearts out during one truly magical night. You can find our team at the corner of 6th and Pine. With your help, we will make it to the Figgy Main Stage to compete against the top caroling teams!

While The Baker’s (Dirty) Dozen warms up their vocal chords, practices scales and rehearses Christmas carols, cue up our Wintery Mix playlist below and take a moment to donate to the Pike Market Senior Center & Food Bank.

Holidays 101: Superb Side Dishes

Turkey gets all the glory on Thanksgiving Day, but no plate is complete without a spoonful of stuffing, tendrils of scrumptious salad, and a beautiful basket of bread. We have some savory side dishes that are so good, they might just steal the spotlight.

Holiday Porcini Stuffing

Holiday Side Dishes

Our Holiday Porcini Stuffing Mix starts with handmade bread that’s dried in-house, then combined with cranberries, savory porcini mushrooms, and a blend of sautéed veggies. With enough stuffing to fill a 14-pound bird, you’re sure to satisfy the entire group – and hopefully have a little leftover for turkey sandwiches. Pick up a package, complete with recipe, at any of our cafés.

Sweet Potato & Delicata Squash Gratin

Holiday Side Dishes

This rich and creamy side dish is a must-have at your holiday table. The combination of sweet potatoes, delicata squash, roasted mushrooms and chopped walnuts will have you rethinking standard mashed potatoes. Click here to print the recipe.

Sweet & Spicy Nuts

Holiday Side Dishes

Sure, our Sweet & Spicy Nuts are irresistible right out of the bag, but they are even better chopped and added to a salad of fresh greens and dried cranberries, a roasted mix of winter root vegetables, or as a topping for sweet potato soufflé. Find our signature blend in our cafés.

Dinner Rolls

Holiday Side DishesWhile we have plenty of loaves to choose from, our pillowy soft, full-flavored dinner rolls are an easy way to wow your guests. Choose from Porcini Harvest, Buttermilk, Rustic Potato, Olivetta or Whole Wheat Cider Rolls or mix and match a couple of trays to suit your guests’ tastes. Leftover rolls will come in handy for making those day-after-Thanksgiving turkey sliders. Find our dinner roll trays in our cafés.